- Published on
How to access Amazon's Selling Partner API
If you need help integrating with e-commerce APIs, get in touch. We spend every day working on tools to speed up and improve e-commerce business processes.
Amazon has released their new Selling Partner API, the successor to Amazon MWS, and MWS is gradually being deprecated. The Selling Partner API has a number of advantages over MWS, as I described in my last post. Now that the new API has been released (at long last), it's time to get access to it! It's not as simple a process as you might expect, if you're used to the ease of access of APIs like Stripe, Google, or Twilio. Let's dive into it.
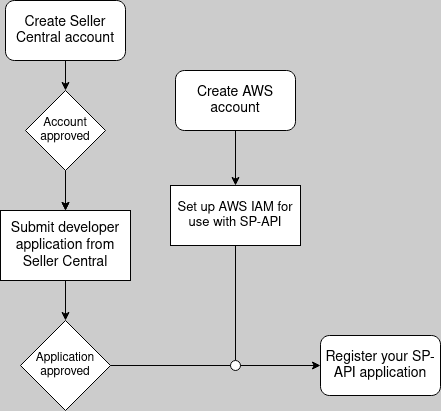
At a high level, here's what you need to do:
- Create a Seller Central account (or log into an existing one if you have it)
- Complete your developer application from within Seller Central
- Register your Selling Partner application, using AWS IAM and Seller Central
These all sound like simple tasks, but together they can end up being pretty time-consuming.
Create a Seller Central account
You need a Professional-level Amazon Seller account to develop Amazon Marketplace apps, whether you're creating a custom Marketplace application to use for your personal Amazon selling business, or making an app to sell on the Marketplace Appstore. Basically, if you want to make use of Amazon's seller APIs for any reason, you need to pay Amazon $39.99/month for a Professional Seller account.
To be extra clear: once you have a Seller Central account, you will apply for a developer account from within your Seller Central account. So all Amazon Marketplace developers have Seller Central accounts, but not all Selling Partners (Amazon's term for their sellers) have developer accounts.
Creating your Professional seller account is a lengthy but straightforward process. You'll need a few things to complete it:
Your business information. In addition to things like your address or business name, Amazon is going to ask for your business type. One of the options is "None, I am an individual." If you're planning on using your Amazon seller account for anything other than selling extra stuff lying around your house, do not select that option! The correct business type for you will probably be "Privately owned business."
You'll also be asked for a "Company registration number." I wasn't sure what this should be for a sole proprietorship in the US, so I emailed Amazon support, and they recommended entering the social security number of the business owner (i.e., me).
Personal information. Your name, address, phone number, and citizenship status, as well as proof of identity (driver's license or passport number).
Billing information. A credit card that will be used to pay for your Professional account ($39.99/mo).
Tax information. Your SSN or Federal Tax ID (depending on your business type), and some other basic tax-related data.
Bank account information. The bank account that money earned on Amazon should be deposited into.
Get started with your Seller Central application here. Your account might not get approved immediately after you complete the application (mine took about a day to process).
Complete your Developer Application in Seller Central
Once your Seller Central account is approved, you can apply for a Amazon Marketplace developer account! Go to sellercentral.amazon.com, then click Partner Network > Develop Apps.
Clicking Proceed to Developer Profile will land you on another hefty form with a few different sections. Contact Information is straightforward, so let's move on to Data Access.
The first dropdown asks whether you're planning to use the seller APIs to make applications for your own Seller account, or applications that will be distributed to other Selling Partners. This totally depends on your use case. If you're not planning on distributing the tools you make, choose the first option. Otherwise, choose the second.
If you're already a Marketplace Web Services (MWS) developer, put your developer ID in the next field. You can find your developer ID on the Partner Network > Develop Apps page.1
Next is a list of roles, each corresponding to a set of resources and operations that are available via the Selling Partner API. As noted on the application form, some of the roles grant access to Personally Identifiable Information (PII), so tighter security requirements are placed on them. I recommend not selecting any of these roles unless you absolutely need to – they will slow down the application process and require you to implement complex data security me asures, and you can always request access to them later if necessary.
Amazon has a lot of rules about what you can and can't do with their data, even if it doesn't contain any PII. I read through the legal documents related to the SP API2, and here are my big takeaways (disclaimer: IANAL).
- Don't share Amazon transaction information or PII with anyone unless it's essential for your app to function. Aggregating customer or Seller information across multiple Selling Partners in order to share that information with other parties is not allowed, unless sharing that data is required for a service you're providing that benefits the Seller whose data is being shared.
- Track and monitor the storage location(s) of all copies of Amazon transaction data and PII. Ensure that no one can access Amazon data without your knowledge. Amazon can audit how well you're doing this whenever they want.
- Maintain certain security standards when working with Amazon data.
- A firewall should be used to block access to your Amazon data from unauthorized IPs.
- Each person with access to Amazon data should have a unique user ID, and user accounts should be monitored for unusual activity.
- Amazon data has to be encrypted when sent over a network (HTTPS works fine).
- There should be a specific plan in place for handling security breaches.
- Aaand even stricter security standards when handling PII.
- PII should be stored for the minimum amount of time necessary. Max 30 days.
- There should be a policy in place for how developers handle PII, and you should keep an inventory of all software and hardware with access to PII.
- All stored PII must be encrypted using AES-128, AES-256, or RSA with 2048-bit key size (or higher) encryption. PII cannot be stored in removable media or public cloud storage.
- Everyone who needs to access PII should have the minimum level of access possible.
- Security monitoring and logging has to be implemented, and all logs should be kept for at least 90 days.
Whew! That's a lot, and just scratches the surface of their policies. If you want or need help with a PII application, let us know – we've successfully gotten through dozens of them.
Now that we're through that, let's move on to the Use Cases section. This is highly dependent on what you plan to build, but in your answers, I recommend restating their questions...For some reason, they seem to react well to that. For example, when answering this prompt:
Describe the application or feature(s) you intend to build using the functionality in the requested roles.
Start your answer something like this:
The application we plan to build using the roles we selected above will...
The "correct" answers to the Security Controls questions can be derived from what I wrote above about the policies around handling Amazon data. I recommend complying with their policies, because they can shut you down whenever they want if you don't.
Once you're done with the whole form, click Register. Then hurry up and wait! It could take Amazon anywhere from a few minutes to a few weeks to approve your application, but it will probably be somewhere in the middle. In the meantime, let's get started registering your (future) Selling Partner API application.
Set up AWS IAM configuration
The SP API documentation has a guide on how to do this, but as of publishing this article (January 2023), there have been some recent IAM updates released, and the guide I just linked to hasn't been updated to reflect those changes. I'll walk you through the full process here. The 30,000ft view of the process looks like this:
- Create an AWS account, if you don't have one already.
- Create an IAM user that will eventually be connected to your Selling Partner API developer credentials.
- Create an IAM policy that grants access to the Selling Partner API to any resource it is attached to.
- Create an IAM role and attach the policy from the previous step to it.
- Add a policy to the user to allow it to assume the permissions of the role.
- Register your new SP API application! (Your developer application has to be approved first.)
Let's go through it.
Create an AWS account
This is relatively straightforward – if you don't already have an AWS account, go to aws.amazon.com and follow the prompts to make an account. If you already have an account, log into it and go to Step 2.
Create an IAM user
Search for IAM in the top search bar, go to the result with the same name, click Users in the left sidebar, and then Add Users.
On the next screen, name your user whatever you'd like – I named mine SPAPI. You don't need to enable console access.
You can click Next through the permissions and tagging steps, and then click Create to finish making the user. You'll be redirected to a list showing your IAM users – click the name of the one you just made, and copy the 12-digit number from the role's ARN – we'll need it later. Then go to the Security credentials tab, scroll down to Access keys, and select Create access key. Choose the Application running outside of AWS use case, click Next, and then click Create access key one more time.
Download the CSV with your credentials, and make sure to save it somewhere safe – if you lose these credentials do, you'll have to create a new set.
Create an IAM policy
Now we need to make an IAM policy, which is basically a ruleset that can be connected to other IAM resources to give them permission to do particular things – in this case, permission to make calls to the Selling Partner API.
Click Policies in the left sidebar, then Create policy. Select the JSON tab, and replace what's there with this:
{
  "Version": "2012-10-17",
  "Statement": [
    {
      "Effect": "Allow",
      "Action": "execute-api:Invoke",
      "Resource": "arn:aws:execute-api:*:*:*"
    }
  ]
}
Skip past the tagging step, and then name the policy whatever you'd like (I chose ExecuteAPI). Finally, click Create policy to finish this step.
Create an IAM role
If you think about IAM users as end users and IAM policies as permissions, IAM roles are the bridge between them. Permissions can be assigned to roles, and then users can assume the permissions granted to the role for a limited time via a short-lived token.
Let's create a role that will allow the IAM user to get access to the SP API via the policy we just created.
Click Roles in the sidebar, click Create role. Under Select trusted entity, choose AWS account > This account.
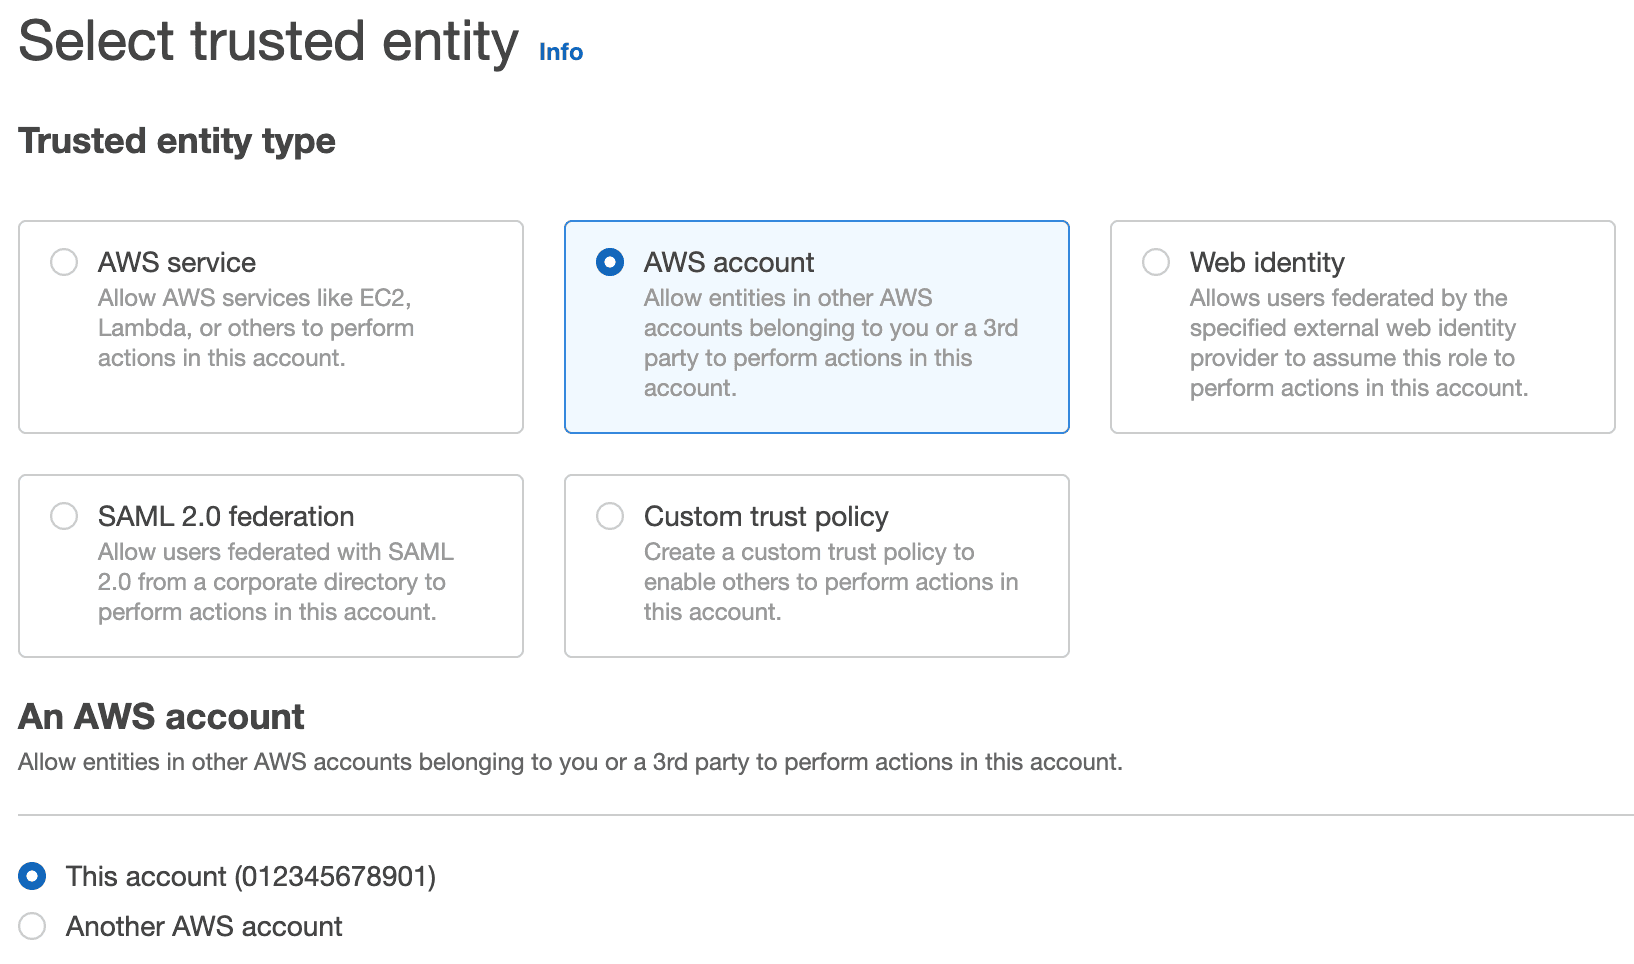
Click Next to the permissions page. There, select the policy you just created from the list of policies. Click Next, name your role (whatever name you want, you know the drill ;), and click Create role. Like when you created the user, select the role you just created from the list of all your IAM roles and save its ARN – we'll need it later.
Allow the user to assume the permissions of the role
In order for our IAM user to be able to make use of the ExecuteApi policy on our role, we need to set up a policy so that the user can "assume" the role temporarily. This is done with Amazon's Security Token Service (STS). Open up the user's permissions by selecting it from the list of users on the Users page, and go to Add permissions > Add inline policy. Then select the JSON tab, and paste this in:
{
  "Version": "2012-10-17",
  "Statement": [
    {
      "Sid": "VisualEditor0",
      "Effect": "Allow",
      "Action": "sts:AssumeRole",
      "Resource": "arn:aws:iam::<id>:role/<role_name>"
    }
  ]
}
Replace the Resource value with your role ARN from the last step. Click Review policy, name this whatever you want (STS-SPAPI for me), and click Create policy.
Awesome – you're done with IAM.
Register your Selling Partner API application
Once your developer application in Seller Central is approved, you can create an SP API application by following this part of the guide.
Now that you have an SP API application, it's time to write some code! Check out this post to learn how to write your first SP API program with PHP, or this one to write it in Java.
If you need help with any of this, get in touch with us at hi@highsidelabs.co. We specialize in developing custom e-commerce integrations, and we can get you back on track quickly. If you want to get notified next time we publish a blog post, subscribe to our newsletter below!
Note: this article is adapted from this post on jesseevers.com, where it was originally published.
Footnotes
If you're registered in more than one marketplace (marketplaces include North America, Europe, Japan, and Australia), you should add your developer IDs for each of those marketplaces to the form field. To find each marketplace's developer ID, switch to a country in that marketplace by the top-center marketplace dropdown menu. ↩
Read Amazon's Marketplace Developer Agreement, Acceptable Use Policy, and Data Protection Policy for the full story. ↩